

I started the project by trying to figure out how I was going to make the controls work. I surfed around and got some information on the web on hacking keyboards. I purchased two keyboards and gave it a whirl. I'm not overly talented with a soldering iron and I managed to destroy the keyboards without any success. I kept investigating and I found a PC joystick that seemed to fit the requirements. The price was reasonable, so I ordered two. (ok, so I was not so confident...) When they arrived I immediately opened it up to see if I could hack it. It was a piece of cake! The cool thing is that the encoder is programmable so I could set it up for multiple emulators or PC games. I mounted the PCB from the joystick to a board, hacked the buttons and connected them to connector blocks from Radio Shack, and wired them into a 36-pin Molex connector.
The idea was to be able to attach the wiring harness with the use of a screwdriver instead of a soldering iron. The wiring harness you see in the picture took about a week to make. It ends with a simple 36-pin Molex connector from a local electronics supply house. A cable comes out of the white jack at the top and attaches to the keyboard port on the computer. Now that the concept was working, it became time to find a box to put it all in. I found a beat up Mortal Kombat conversion in the back of a local distributor's warehouse. I bought it for $35.00 and brought it home. What a piece of garbage! The cabinet was water damaged rusted. The dirt was so thick, I did not even know if it had a CPO or not, until I cleaned it. It turned out that the game actually still worked. I began taking it apart. I gave the guts to my friends to play with, I just wanted the cabinet. I soon discovered that the machine was originally a Centuri Phoenix. (my all-time favorite game as a kid.)
I took the cabinet over to my Father's house where we began to structurally reinforce the cabinet. Then we removed all the carriage bolts, counter sunk the holes and put the bolts back in. I filled in the holes and resurfaced the cabinet. A big problem was discovered. Phoenix machines did not use standard T-moldings on their cabinets. The channel is off set to one side. This molding is simply impossible to replace. The final solution came when I had to use an iron-on wood veneer edging to seal all the edges. I then painted the veneer black, sanded, painted, sanded etc. until the edges were a smooth finish. This detail turned out to be one of the nicest features of the cabinet.
Now came
the hardest challenge of the project, designing a control panel that works with
a wide variety of games. While I knew that the machine would have
interchangeable control panels, I wanted to design a main panel that would be on
the machine most of the time. (I'm a bit lazy) The logical approach
led me to the game Defender.
The reason I chose to base my design on Defender was the fact that it was one of
the most complicated panels from that era. I figured I could work other
controls around that layout. In order to get the measurement correct, I
purchased a control panel from a Defender machine and made my first prototype
panel out of plywood. I used joysticks and buttons from Happ
Controls. I hooked the whole thing together and gave it a play. It was
great! I played a whole series of games and scribbled adjustment notes on
the panel. Soon, I had the main panel designed.

The second panel played out the
same way. I had to consider the games that could not be played with the
first panel. The second panel was based on Missile
Command and the angular joystick was based on Q*bert.

Once the control panels were completed, I had to devise a way to coin up the
games. I wanted to keep the machine as classic as possible without having
to stuff quarters in it. The final solution was to install micro switches
behind the coin return buttons. All the player has to do now is touch the
coin return and the credit is registered. This worked so well that I
eventually converted all the machines in my collection to coin up this way.
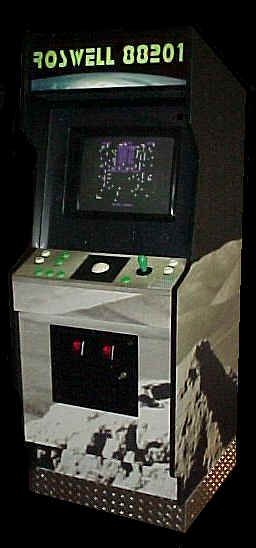
At this point I had a functional game. Now it was time to make it look pretty. I decided on the Roswell theme for no other reason than I liked the way it sounded. The whole alien thing seemed to play into alot of the classic games, so why not. I designed the marquee on my computer using Paint Shop Pro 5. The true challenge was to make the marquee look nice when lit from behind. I had the first printing done by a professional. It came out beautiful. The problem was, that when the marquee was back lit, light was passing through the black making those areas appear gray and patchy. What I ended up doing was having a second copy printed, and very carefully cut out all the colored sections with an x-acto knife, leaving just the black behind. I then placed this second layer behind the first. Turn on the light, problem solved. Both layers were then sandwiched between two pieces of plexiglas to keep them from shifting or warping.

The cabinet graphics were a real pain in the butt. I had to attach them with wallpaper paste. It was a slow process. I had to be careful to keep the sides lined up with the front and the control panel. I covered the control panels as well then covered them with a thin piece of Plexiglas to keep them protected. The bottom of the cabinet is wrapped with aluminum diamond kick plating. Looking back, that was one of the best things I did. I installed a two speaker sound system in the panel above the screen with a volume control and a headphone jack for private play. There is a switch hidden in the front of the machine that turns on a sub woofer that is inside the machine. The sound is really great! The whole machine shakes with the base. I purchased a monitor bezel from Happ Controls. I put matching star graphics on that as well. I made up instruction cards and they now appear on each control panel.
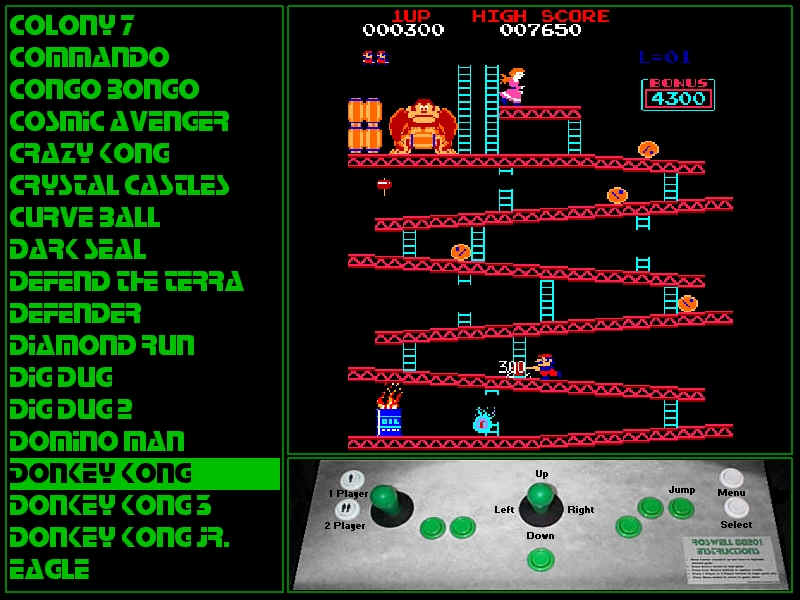
Moving the center joystick up and down, they toggle through the list of games.
If they hold the joystick the list begins scrolling, gradually gaining speed. You can get through the entire list of 300 in a few seconds.
If they tap the joystick to the right or left it will move to the next letter in the alphabet. (tap-A, tap-B etc.) The same holds true about holding the joystick right or left, just faster yet.
As you scroll through the list, a picture of the control panel that goes with each game is displayed in the lower left corner of the screen.
The labels below the buttons also change to show how each game is played.
Once the game desired is highlighted, you then press the "Select" button to select the game.
A full screen bit map of the game then appears with the message "Loading _____" and the game loads.
Once the game is loaded, all the user has to do is touch the coin return to load in the desired amount of credits.
Press the Player 1 or Player 2 buttons and have a ball!
At any time during game play, the user can press the "Menu" key to return to the menu of games.
When the game is not being used, a very cool screen saver randomly splashes bit maps of the assorted games on the screen until the screen fills up. Then, the Roswell logo rolls out onto the screen and the bit maps begin again. It's actually entertaining to just watch the screen saver.
The Main Menu
The Screen Saver

The Screen Saver with the
splashing bit maps

No, it was custom made for this machine and I promised the author that I would not distribute, sorry.
![]()
Return to Craig's Arcade Home Page


Visitors